Alternate tail design - The
T-tail
 Mr.
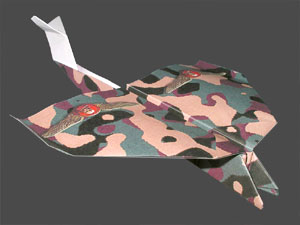
Stanley With, and his son, Marcus Stanley With, of Denmark were
kind enough to send us a photograph of their creation. It is a camouflage
version of our paper airplane. What immediately caught my attention was
their distinctive new tail design. It is a design called the T-tail
which can be seen on many airplanes today such as the Boeing 727, Douglas
DC-9 and some light aircraft and military aircraft. On most airplanes
the elevators project from the fuselage at the base of the fin or tail.
On the T-tail the elevators are mounted on top of the fin.
Mr.
Stanley With, and his son, Marcus Stanley With, of Denmark were
kind enough to send us a photograph of their creation. It is a camouflage
version of our paper airplane. What immediately caught my attention was
their distinctive new tail design. It is a design called the T-tail
which can be seen on many airplanes today such as the Boeing 727, Douglas
DC-9 and some light aircraft and military aircraft. On most airplanes
the elevators project from the fuselage at the base of the fin or tail.
On the T-tail the elevators are mounted on top of the fin.
After receiving the e-mail I immediately folded a model duplicating the
design of Stanley and Marcus. At first throw, it glided beautifully. Because
of the larger tail area, it seemed to fly streighter than the standard design
and I found that it was easier to adjust flight characteristics by bending
up or down the trailing edge of the elevators.
I then became curious about the reason for using this design on aircraft
rather than the more common configuration. I found that there were advantages
and disadvantages.
Advantages:
- The elevators are kept out of the airflow behind the wings, resulting
in a smoother air flow, better pitch control especially when operating
at low speeds.
- This design is also well suited for aircraft with a rear mounted jet
engine.
Disadvantages:
- Aircraft will tend to be much more prone to dangerous deep stall conditions,
where blocking of the airflow over the tail plane and elevators by a stalled
wing can cause total loss of pitch control.
- The elevator surfaces are difficult to inspect from the ground.
For those who would like to experiment with the T-tail,
I have described the folding instructions below:
Fig 1 - After you complete step 24 of
the paper airplane assembly instructions, you will have a strip of paper
used to make the tail. Fold the strip of paper down the center to form a
trough, and then open it up flat again. Mark with a pencil points A and
B as shown using the same dimensions indicated in Fig 1.
Fig 2 - Fold the fuselage into a V, then at point A, push
the tail up at the angle shown and fold it in such a was as to invert the
V as shown at the top of the tail.
Fig 3 - At point B, fold the tail down reversing the
V as shown. This part of the tail should be parallel with the fuselage.
Fig 4 - Tape the trailing edge of the rudder together as
shown. Push the V shape elevator down flat and crease the paper to make
it hold the horizontal position.
Fig 5 - The completed tail can now be inserted into the
paper airplane body, Step 32 of the paper airplane instructions.
Thank you Mr. Stanley With and son Marcus for your valuable suggestion.
| Return to assembly instructions | Top of page |
All contents copyright © 2004,
Conceptos Digitales C.R., S.A. All rights reserved.
URL: http://www.zurqui.co.cr/ Revised: Nov. 24, 2004