
Monarch Butterfly
 A stylized
representation of this well know butterfly. It can be found in southern
Canada, The United States and Central Mexico. These butterflies migrate
between Canada / U.S. and Mexico.
A stylized
representation of this well know butterfly. It can be found in southern
Canada, The United States and Central Mexico. These butterflies migrate
between Canada / U.S. and Mexico.
Download the design
The download is an Adobe Acrobat PDF file (64.5K).
![]() Download Monarch
Butterfly
Download Monarch
Butterfly
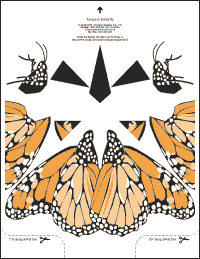
Monarch Butterfly PDF sheet.
Don't have Adobe Acrobat?
Download the latest version of the free Adobe
Acrobat Reader. The Adobe Acrobat reader allows you to download, view
and print PDF files. You must have the Adobe Acrobat Reader
installed on your computer to view and print this project.
Printing
Use an ink-jet printer or color laser printer. Print the PDF file on regular white bond paper.
- Paper size: 8 1/2" x 11"
- Area of impression: maximum
- Size: 100%
- Position of impression: centered on page (important)
- Margins: As small as possible
- Printer mode: color
- Print quality: fast (medium quality, saves ink)
Open the PDF file using the Adobe Acrobat Reader and set up your printer as close as possible to the printer settings shown here.
The setting, (Center on page), is very important. Folds will not match the design if the image is not printed in the center of the page.
Wait for the paper dry before starting your project.
On this project you have the option of printing on one side or both sides of the paper. Your paper airplane will look more realistic if you print on both sides. Just make sure that the second time you load the printer the arrows at the top of the page point the same direction after printing.
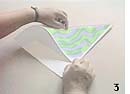
Folding the paper airplane
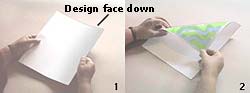
After printing, you will notice an arrow at the top of the
sheet. This arrow should be pointing away from you when you flip the paper
over, image side down, as shown in diagram 1. If
you printed on both sides of the sheet, just make sure that the arrow is
pointing away from you when you start to fold the airplane.
Fold as shown in diagram 2 and 3. Now bookmark this page as you must go to the Best Paper Airplane assembly instructions (steps 1 to12).
When you reach step 22, do not crease the wing as indicated in the instructions. Instead cut the wing aling the dotted line as shown in fig.1.
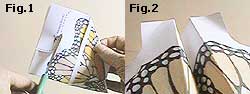
The resulting short tail can be adjusted after test flying the model. If the airplane dives, bend the trailing edges of the tail up slightly as shown in fig.2.
Steps between 22 and 35 are not needed because you don't need a separate tail for this model.
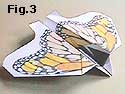 The
wings should be almost flat for stable flight, see fig. 3.
The
wings should be almost flat for stable flight, see fig. 3.
When you finish, you should have a model that looks just like the photograph at the beginning of this page.
To learn to fly the plane go to How to fly it.